Using Amazon Glacier on Linux

Amazon Glacier

Amazon provides a low cost backup service called Amazon Glacier which a payment plan reflecting the amount of data that you store with a price in the range of $ 0.01 per GB. However beware of the other costs for requests and especially the fee related to requesting and downloading data from the remote storage.

It might not be strait forward to calculate the actual cost but with the Amazon calculator it is possible to give a pretty good estimate. It roughly seems like the cost of retrieving your data matched what you pay a month to store it.

The service is available through the Amazon Web Services interface where you can signup and joint the service.

Using Amazon Glacier on Linux

Using Amazon Glacier is pretty easy on Windows through e.g. FastGlacier or on Mac with Arq. However, if you are running Linux, in my case Gentoo, with no desktop then the number of clients to choose from is very limited when it comes to being able to sync folders without having to re-upload it all. I found a few options mainly on github.

I found the project mt-aws-glacier project which seemed to do the job.

Synchronisation can be done with a config file that contains the essentials like:

key=GLACIER_KEY
secret=GLACIER_SECRET_KEY
region=us-east-1
protocol=http
dir=/mnt/disk/Photography
vault=photography
journal=/mnt/disk/journals/photography-journal.log
concurrency=10

and then using it with mtglacier like:

mtglacier sync --delete-removed --replace-modified --new  --config=configs/photography.cfg &>logs/photography.log &

This will sync the /mnt/disk/Photography folder with vault ‘photography’ and store synchronisation data in the photography-journal.log file. This log file can be reconstructed but it may be easier (and cheaper) just to store it in e.g. amazon S3 since it is relatively small. This can be done with ‘s3cmd’ which also is able to sync one or more files. The following command syncs the journals folder to a remote vault in S3:

s3cmd sync /mnt/disk/journals/ s3://journals

Enabling Apple AirPlay across subnets/networks

The Bonjour service that Apple AirPlay uses to discover devices is limited to only work on a single network (subnet). However, in a home network with  multiple subnets and or routers AirPlay wont work out of the box.

Here is an example of such a network:

  • router 1 (192.168.1.0) – connected to the internet
  • router 2 (192.168.2.0) – tunnels all traffic to the internet through a VPN (or other company related traffic)
    • router 2 is connected to router 1 through its wan port and runs as a router (no NAT)

The challenge is to get two apple devices to talk together when one is connected to router 1 and the other connected to router 2. To enable this one has to take a look at the mechanism that Bonjour uses for discovery namely multicast DNS (mDNS).

In my case the routers I used were installed with DD-WRT which is a custom firmware but it didn’t come with anything that could allow me to parse do multicast between my LAN (br0) and WAN (vlan1/[vlan2]).

But I can across this post by Darell that gave a good description of whats needed. Essentially he describes how to compile ‘mdns-repeater’ which is a small tool that can do mDNS between two interfaces in the DD-WRT router.

He also lists Tildesoft.com Bonjour Browser, a useful tool for inspecting Bonjour messages.

Putting the mDNS repreater to work on a DD-WRT device with no space avaliable for storing the program can be achieved through the startup or firewall scrips like:

wget -O /tmp/mdns-repeater http://192.168.0.1/mdns-repeater && chmod +x /tmp/mdns-repeater && /tmp/mdns-repeater br0 vlan1

To speed up the process a precompied version does exist of mdns-repeater located in the this forum. But can also be downloaded from mdns-repeater.

Guided Access useful feature when kids use the iPad

The somewhat hidden feature “Guided Access” lets you restrict the access to the iPad by requiring a pass code. It is possible to restrict hardware buttons, touch screen touch area and auto rotation.

Tagged with: ,

One-way Synchronization with sFTP

Here is a solution that allows synchronization (mirroring) of a sFTP folder with a local folder. The solution provided here uses the free WinSCP program. An alternative to this approach could be the paid software GoodSync which is fairly easy to use.

Tasks

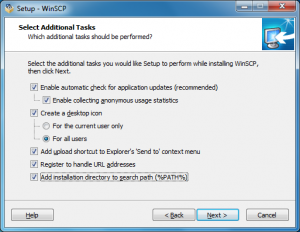
  1. Download and install WinScp and add it to the PATH variable through the custom install.
  2. Configure a session in WinScp
  3. Write the sync script used by WinScp
  4. Write a batch file to call WinScp
  5. (Optionally) add a scheduled task to run the sync script.

Installing WinScp

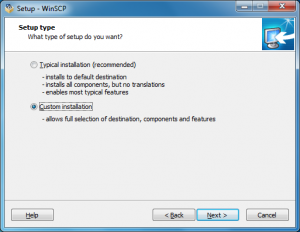
Just use the installer for Windows and select custom install and check the add to PATH variable in the installer when the tab shown below appears.

WinScp custom install

WinScp add to PATH

Configure a Session in WinScp

Start WinScp after the installation completes and create a new session. This session must be stored with all transfer settings and password.

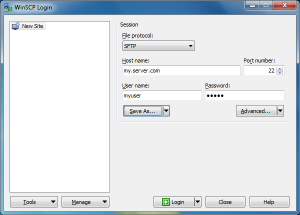
First enter host name, user name and password. Then click the advanced button:

winscp-create-login

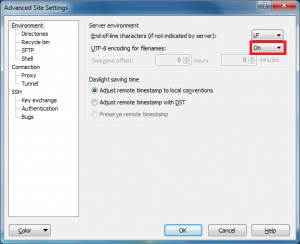
In the advanced dialog change the drop-down for UTF-8 encoding filenames to “On”. This is needed to make Danish characters “ÆØÅæøå” show correctly on the computer that fetched the files.

winscp-create-login-encoding

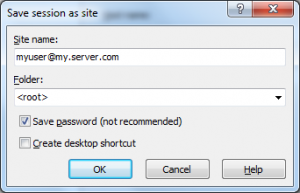
Finally, save the session by clicking Save As…”. The name entered here “myuser@my.server.com” is the name that will be used later in the sync script.

winscp-create-login-save

Sync Script

WinScp needs a sync script that lists the commands and settings it must use to sync the remote sFTP path to the local directory. Below is shown a script “script.bat”:

# Automatically abort script on errors
option batch abort
# Disable overwrite confirmations that conflict with the previous
option confirm off
# Connect using a password
# open sftp://user:password@example.com -hostkey="ssh-rsa 1024 xx:xx:xx:xx:xx:xx:xx:xx:xx:xx:xx:xx:xx:xx:xx:xx"
# Connect using stored connection
open "myuser@my.server.com"
# Force binary mode transfer
option transfer binary

synchronize local -delete -mirror C:\sync-tmp /

# Disconnect
close
exit

Note that the script references two settings that must be customised upon re-use.

  1. The stored session name. (“myuser@my.server.com”)
  2. The path to which the files will be synced. (“c:\sync-tmp”)

Note that the script contains a comment which lists the case where a session is opened using a hostkey instead of a stored password.

Batch script to invoke sync

To make it easiere to run the sync script a wrapper batch file can be created “do-sync.bat” that can look like this:

"c:\Program Files (x86)\WinSCP\WinSCP.com" /console /script=sync.bat /log=sync.log

The batch script just calls WinScp (without starting a new application, change .com to exe to do so) with the sync script and also sets a bath to a log file that it uses.

Configure scheduled task

The do-sync.bat file created in the previous step can now be used in a standard Scheduled Task in Windows to setup a recurring task for fetching an update daily/weekly or …

For instructions see the guide from Microsoft.


ExifTool to read or modify EXIF data

This ExifTool is a nice command line based tool that allows read and write of properties from Exif an others. It can easily be used in the shell to e.g. collect information about images or just to list all properties.

ExifTool by Phil Harvey

The tool can be used with no arguments like:

exiftool IMG_0001.jpg

resulting in the output:

Artist : Kenneth Lausdahl
Exposure Time : 30
F Number : 9.0
Exposure Program : Manual
ISO : 100
Exif Version : 0230
Date/Time Original : 2012:12:12 19:07:19
Create Date : 2012:12:12 19:07:19
Shutter Speed Value : 30
Aperture Value : 9.0
Exposure Compensation : 0
Max Aperture Value : 4.0
Metering Mode : Multi-segment
Flash : Off, Did not fire
Focal Length : 67.0 mm
Sub Sec Time Original : 01
Sub Sec Time Digitized : 01
Focal Plane X Resolution : 4438.356164
Focal Plane Y Resolution : 4445.969125
Focal Plane Resolution Unit : inches
Custom Rendered : Normal
Exposure Mode : Manual
White Balance : Auto

If only a single property is desired then this argument can be used to just extract the date from when the photo was taken:

exiftool IMG_0001.jpg -EXIF:DateTimeOriginal

When using this tool to sort some pictures, mainly removing duplicates, I came a across the small tool tag which allowed me to tag files in Mac from the terminal. This could then be used in combination with the ExifTool for marking duplicates.

tag -a IMG_0001.jpg

Cloning NTFS disk with errors

I have a Windows 7 disk with the NTFS file system on multiple partitions that I want to clone since the disk seems to be dying (it has problems spinning the disk plates, or at least that’s how it sounds).

My first approach was to use a bootable cd with Acronis TrueImage which normally works just fine but apparently this time it chose to complain about two things:

  1. Source disk has errors
  2. Destination disk too small

I ran check disk on the source disk (which by the way takes for ever to complete) but it didn’t change error message given by Acronis TrueImage. My destination disk is exactly the same size so that shouldn’t be a problem either.

So I tried to do it manually by downloading a GParted Live cd that contains all the tools needed:

  • dd
  • sfdisk
  • ntfsclone

Backup Master Boot Record (MBR) and extended partitions

My source for this is page.

Backup the MBR to backup-hda.mbr:

cd /root
mkdir partition-backup
cd partition-backup
dd if=/dev/hda of=backup-hda.mbr count=1 bs=512

Then save the extended partitions:

sfdisk -d /dev/hda > backup-hda.sf

Restore the MBR and extended partitions

Important: Double check the destination, if wrong you can destroy data.

Restore MBR:

dd if=backup-hda.mbr of=/dev/hdb

Restore extended partitions:

sfdisk /dev/hdb < backup-hda.sf

Clone the data

Here I used ntfsclone which can save the data of a disk either to an image file or an other disk. In my case I cloned directly to the new disk. I used the –rescue and –override arguments since my disk might have errors as pointed out earliere and because we just copied the partitions over (we know that the partitions on the destination disk is just zeros so we can override them). More info can be found here, it also describe how to clone disks with different sizes.

Important: Double check the source and destination parameters.

In this case I want to clone my disk sda1, sda2 and sda3 to sdb1, sdb2 and sdb3 so I run ntfsclone for each of them like this (shown for sda1 cloned onto sdb1):

ntfsclone --rescue --overwrite /dev/sdb1 /dev/sda1

Of cause it takes a while for a big disk but the time it takes to copy was in my case a lot less than the time windows check disk takes to check the disk.


Installing Cyanogenmod on HTC Desire and make it look similar to HTC Sense

Why would you install a custom ROM on your Desire? You ran out of space for Apps!

Rooting the Phone

First step is to get root access (if you want to us a program like ROM Manager)

 Installing Cyanogenmod

  1. Go to here and find a pre build you want to install (for HTC Desire only)
  2. Place the zip on the SD card
  3. Boot the phone into revovery (Hold down volume down and power to enter this menu)
  4. Select install zip and select the zip
  5. Reboot

Make the new ROM look like HTC Sense

First the Theme

  1. Look here for a theme you like and download it to you SD card
  2. Enable app install from unknown source
  3. Use a file manager to select the apk file and install it
  4. Open the Theme Chooser and install the theme

Getting more space for Apps (one of the primary reasons for choosing a custom ROM)

  1.  Use ROM Manager to prepare the SD card
  2. Install s2e
  3. Open s2e and enable mount from the SD card for the options desired

Sense like Apps:

  1. LP Sense UI apk (the home screen)
  2. Widgetlocker Lockscreen (if you dont like the default one in Cyanogenmod)
  3. The Weather widget from Sense: Fancy widgets app looks almost the same
  4. LED: Light Flow app allows control over when the LEDs light up enabling customisation.

Eclipse User Interface Guidelines

When developing Eclipse plug-ins it is recommended to follow the Eclipse User Interface Guidelines as described athttp://wiki.eclipse.org/User_Interface_Guidelines


Update and Configure ConnectBlue OEMSPA310

The following gallery explains how to configure and firmware update the OEMSPA310 module.

The firmware update description is available here.

Tagged with: ,

SourceForge Git auto-login in Windows 7

TortoiseGit auto log-in at SourceForge can be achieved through key authentication through Putty.

  1. The first step is to create a key set go to the putty section from the link below
    1.  https://sourceforge.net/apps/trac/sourceforge/wiki/SSH%20keys
  2. Now associate the public SSH key with your SourceForge account
    1. https://sourceforge.net/account/ssh
  3. Finally you need to configure Putty to know about your private key such that plink.exe can use it when authentication is done.
    1. Open putty and load the default settings from the “Session” tab
    2.  Navigate to “Connection->SSH->Auth”
    3. Specify the path to your private key in “Private key file for authentication:”
    4. Go back to the “Session” tab and save the changes to “Default Sessions”
  4. Now you are done.

Other links:

https://sourceforge.net/apps/trac/sourceforge/wiki/Git

http://code.google.com/p/tortoisegit/wiki/UsingPuTTY

Top